Browsed by
Author: Jim Pearson

Memphis recap

Memphis recap

Well, the first day of the road trip is about passed and we’re back in the motel for the night.

We got into town about 3pm and after checking in we headed out to drive past Graceland to see if we could get a picture without taking the tour and it was a wasted trip as it’s way off the road behind trees.

So we went on downtown the see the other sights. Parked right next to the street car stop and took a ride on the river line. The coaches were old restored ones and really neat, well at least from my standpoint. We jumped off along the river and went down along the waterfront to do some shooting. I did my first HDR of the trip there, but will process it at a later date.

We caught the trolley back down to Beale Street for dinner at BB Kings place. The BBQ ribs were outstanding and messy. The blues group that was playing was The King Beez and they put on a great show.

After walking around Beale Street shooting pictures for awhile we decided to call it and end to the first day of our road trip.

Tomorrow we’re off to Oaklahoma Ciy for our next adventure… Stay tuned.

First leg of trip underway

First leg of trip underway

Well.. We’re under way and got off pretty much on time, even by our standards. At the moment we’re about 120 miles from Memphis, our first stop on this road trip. We’re planning on dinner at BB Kings on Beale Street tonight… Looking forward to hearing some great music.

Don’t think we’ll tour Graceland, but we’ll drive by and see. We think we’d enjoy other things more and since neither of us are real big Elvis fans and they want about $65 for the whole tour.

I’m constantly amazed by what we can do with today’s technology. I’m writing this post as we head West on I-40 using my iPhone. – Stay tuned!

Yes… there’s an App for that also!

Yes… there’s an App for that also!

Well, I’m taking a break for getting things together for tomorrow’s roadtrip departure and decided to do a short post for an App I found for the iPhone that makes using my two new Analog Cameras easier to use. Neither of these cameras come with any sort of light metering system and I originally planned to use my D700 to meter the scenes, but on a whim I decided to see if there was an App for that and there is!

“FotometerPro By Kit Da Studio is a light meter for iPhone 4, iPhone 3GS, iPod Touch and iPad 2. It’s one of the best companions for your Hasselblad, Rolleiflex TLR, Nikon/ Canon SLR… or any old film cameras, Lomo toy cameras and even DIY pinhole cameras! It is compatible with iPhone, iPod touch (4th generation), iPad 2 Wi-Fi, and iPad 2 Wi-Fi + 3G. Requires iOS 4.1 or later” and it only costs 99 cents!

On the iTunes store one customer review by by dontbuyfoliobook says: Works Great! I just purchased this and checked it against my sekonic hand held $400.00 meter. Mostly just checked incident metering. It was dead on accurate in the shade, sunlight and in the house. I also checked it against my canon s95. It produced better readings than that meter both incident and reflective.

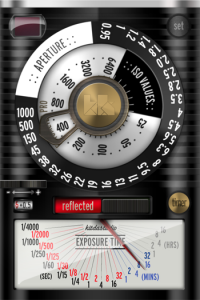
After downloading, installing and using the meter on my first two rolls in my pinhole camera I have to agree with him that it does an amazing job. Really easy to use and you can switch easily from reflective (light reflecting from the scene) to incident (light falling on the scene) readings. A large window at the bottom gives you your exposure times ranging from 1/4000 sec to 16 hours! You also have an easy to rotate dials to change your ISO and aperture settings to match your desires. Personally, I don’t think you can go wrong with this App if you’re in the market for a light meter.


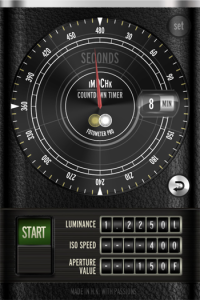
Left, Aperture and ISO is easily set by putting your finger on the ring and rotating it and readings show in the window below. You can then click on the timer button and the app will switch automatically to a countdown timer.

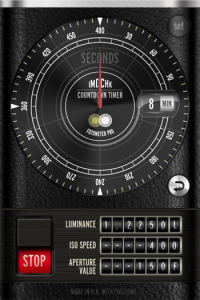
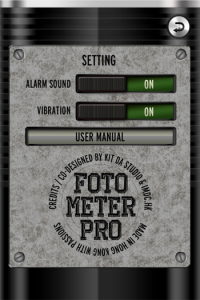
Left, slide the star button in lower left to start the timer. You can turn an alarm and vibration on in the settings menu. If you have your phone set to sleep after x number of minutes, don’t worry as the timer will keep working in the background and alert you when it’s time to close the shutter.
First processing in a long time and camera samples

First processing in a long time and camera samples

Here’s a couple samples from the first shots from my new “Analog Cameras” for our upcoming California and back roadtrip.

The Dock
This is from the first roll on the Sprocket Rocket camera. Alas, the Epson V750 scanner I used to do this test wouldn't see the special holder that allows scanning of the sprocket holes so I had to use the one that came with the scanner which covered the sprockets. The image at the top of the site was also shot with the same camera. - Photos by Jim Pearson


Holga
This is one of the images shot with the Holga 120 Superwide Pinhole camera. Pinhole photos have an inherent softness to them I had forgot about. Kinda nice, There's a ridge around the lens on the front of the camera and notice how the pinhole also caught the edges of it in the field of view. - Photo by Jim Pearson


New Analog Cameras for upcoming trip

New Analog Cameras for upcoming trip

I just bought my first two “Film” cameras in probably over 10 years for my upcoming trip the middle of September. My sister and I will spend three weeks driving to California and back with the longest stops for my Combat Camera Reunion in Albuquerque, New Mexico, to visit friends in California and several days at Moab, Utah to do some shooting at Arches National Park. We will also stop overnight in many other place along the way of course… but I’m off the topic of my first post here, so let me get back to the cameras.

I wanted to do something different for this cross country trip, which I’ve done several times before over the years, mostly following the railroad to photograph trains. I saw a post on Facebook where a photographer had done a really nice series on events around the site of the twin towers in New York using a camera called a Sprocket Rocket. It’s a film camera that allows you to shoot panoramic photos on 35mm film and you can choose to use the sprocket area of the film to record your image on or not. I really liked the idea and purchased one from lomography.com for the upcoming trip. I’m currently working shooting some test shots for my first roll and will post a sample photo soon.

The camera has two settings for shutter speeds, 1/100 and Bulb, with two settings for f/stops which are 10.8 and 16… basically cloudy and sunny. So, it should be a fun camera to play with during my trip.

The other camera I bought from the same place is a Holga 120 Wide Pinhole Camera, It uses 120 film and since it’s a pinhole (f/stop around f/135) the only shutter speed is bulb! It’s also a superwide panoramic camera that shoots a negative/positive of 6x12cm, which is about two standard exposures on 120 film on one piece of film. Since I’ve got a bunch of refrigerated 120 film and still have my traditional darkroom, I’m in the process of shooting my first test roll of TMax 400.

I’m excited about the prospects of shooting with both these cameras for this upcoming and future trips over the years.

Of course I’m not going to be totally analog when it comes to the finished product with these cameras as I also bought film holders for both that will allow me to scan the film in to the computer and use my darkroom of choice these days, Photoshop.

Stay tuned… Jim